Cisco 877: configurazione del server DHCP integrato

Come ogni router che si rispetti, anche il Cisco 877 può essere configurato a mo’ di server DHCP, seguendo una procedura abbastanza semplice ed intuitiva. In questo post vedremo come tirare giù una configurazione base, comprensiva di una exclusion e di una reservation.

cisco 877Definizione dei pool DHCP e della reservation

Per prima cosa occorre definire i pool di indirizzi IP da cui il nostro server andrà “a pescare” quelli da assegnare alle macchine che ne faranno richiesta. Nello specifico, ho creato 2 pool, uno per gli indirizzi della LAN (pool wifi) ed uno necessario alla reservation (pool pcportatile), ovvero:

ip dhcp pool wifi
   network 192.168.7.0 255.255.255.0
   default-router 192.168.7.1
   dns-server 192.168.7.1
!
ip dhcp pool pcportatile
   host 192.168.7.3 255.255.255.0
   client-identifier 0149.d224.a5d4.0e
   default-router 192.168.7.1
   dns-server 192.168.7.1

Da notare che per il pool pcportatile ho utilizzato la direttiva client-identifier, recante il MAC address del dispositivo oggetto della reservation, nella forma aaaa.bbbb.cccc e con prefisso 01. Nella fattispecie, il MAC address del PC è 49:d2:24:a5:d4:0e, che in notazione Cisco diventa 49d2.24a5.d40e. Aggiungiamo quindi lo 01 come prefisso ed avremo il client-identifier finale, ovvero 0149.d224.a5d4.0e.

Detto ciò, un modo rapido di ricavare il suddetto identificativo consiste nell’utilizzo del seguente comando:

sh ip dhcp binding

il cui output sarà simile al seguente:

Bindings from all pools not associated with VRF:
IP address          Client-ID/              Lease expiration        Type
                    Hardware address/
                    User name
192.168.7.3         0149.d224.a5d4.0e       Infinite                Manual
192.168.7.8         0151.f0d3.fc7d.54       Sep 07 2016 09:15 AM    Automatic

Definizione dell’exclusion

Per ciò che concerne l’exclusion, la sua configurazione consta di un’unica direttiva, ovvero:

ip dhcp excluded-address 192.168.7.2

In tal modo faremo sì che l’IP 192.168.7.2 non rientri nei pool precedentemente definiti e quindi non possa essere assegnato a nessun dispositivo (poichè trattasi di un indirizzo statico associato ad una stampante).

Il post termina qui, alla prossima.

Hardening del servizio Remote Desktop su Windows Server 2008 R2

Uno dei target preferiti dagli script kiddie è il servizio Remote Desktop di Windows. Vi assicuro che, giornalmente, i tentativi di bruteforcing contro di esso possono superare (e anche di molto ) il centinaio. Proprio per questo motivo ho deciso di mettere in atto tutta una serie di accorgimenti in grado di limitare questa tipologia di attacco, basandomi principalmente su due strategie:

1) quella proattiva, grazie alla quale è possibile bloccare l’IP sorgente dei tentativi di intrusione;

2) quella passiva, basata sul monitoraggio in tempo reale degli eventi di Windows, con la generazione di alert ad hoc da parte dell’NMS (Nagios) nel caso in cui vi siano episodi di logon falliti.

user-enumeration-mediante-nmap-L-gnHMmv

Entrambe le suddette strategie si applicano a tutti i servizi attivi sulla macchina remota e che prevedono autenticazione (FTP, HTTP, ecc.), incluso, ovviamente, il Remote Desktop.

Ingredienti

I software necessari per l’hardening del servizio Remote Desktop sono i seguenti:

1) Il tool IPBan (che potete scaricare gratuitamente da qui), il quale è in grado di bannare l’IP sorgente degli attacchi dopo un determinato numero di tentativi di accesso falliti;

2) Il tool NSClient++ (anch’esso gratuito, lo si può scaricare da qui), nella versione 0.4.1.105 per architettura a 64 bit (la più recente tra quelle che non hanno problemi con il matching dei filtri sul monitoraggio degli eventi di Windows).

Lato NMS, invece, è necessario installare e configurare NSCA server, il quale rimarrà in ascolto sulla porta TCP 5667 nell’attesa che NSClient++ gli inoltri qualche evento (grazie all’applicativo NSCAClient). Una volta ricevuto l’evento, esso verrà dato in pasto a Nagios che, grazie ad un servizio di tipo passivo, genererà un allarme specifico in grado di ragguagliarci sul tentativo di accesso fallito.

Installazione e configurazione di IPBan

Prima di installare il suddetto tool è necessario configurare la macchina su cui è attivo Remote Desktop, operando mediante l’utility secpol.msc (Local Policy -> Security Options) ed impostando i seguenti parametri:

1) Network security: LAN Manager authentication level da settare su Send NTLMv2 response only. Refuse LM & NTLM

2) Network security: Restrict NTLM: Audit Incoming NTLM Traffic da impostare su Enable auditing for all accounts

3) Network security: Restrict NTLM: Incoming NTLM traffic da impostare su Deny all accounts

Inoltre, è necessario settare su Allow connections from computers running any version of Remote Desktop (less secure) il tab Remote delle impostazioni di sistema (vedi lo screenshot sottostante).

RDP

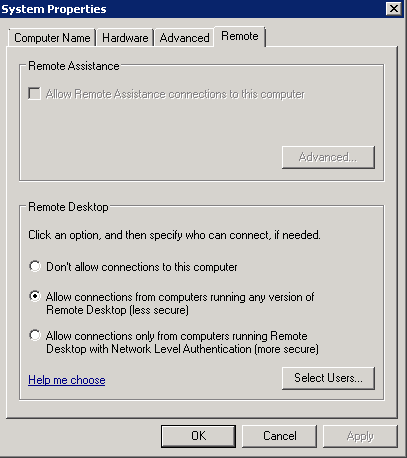
Tali direttive sono necessarie affinchè sul log degli eventi di Windows venga salvato l’indirizzo IP sorgente dell’attacco, in modo tale che IPBan possa riconoscerlo e quindi bloccarlo.

Una volta fatto ciò, estraiamo il contenuto del file IPBan.zip all’interno di C:\IPBan e lanciamo il prompt dei comandi con privilegi di amministratore, per poi digitare il seguente comando:

C:\IPBan> sc create IPBAN type= own start= auto binPath= C:\IPBan\ipban.exe DisplayName= IPBAN

il quale ci permetterà di creare un servizio apposito basato sul tool appena scaricato.

Inoltre, editiamo il suo file di configurazione (IPBan.exe.config), portando a 3 il numero massimo di tentativi di logon falliti prima del ban (tale valore, di default, è pari 5):

<!-- Number of failed audits in the event viewer before banning the ip address -->
<add key="FailedLoginAttemptsBeforeBan" value="3" />

Infine avviamo il servizio precedentemente creato:

C:\Users\Administrator>net start IPBAN

Installazione e configurazione di NSClient++

Come già detto in precedenza, il suddetto software ci consente di monitorare in tempo reale gli eventi di Windows, filtrandoli in modo opportuno.

Nel mio caso ho scelto di installare solo ed esclusivamente i plugin più comuni ed NSCAClient, il quale interagirà col nostro NMS.

Di seguito riporto uno screenshot esplicativo:

nsclient

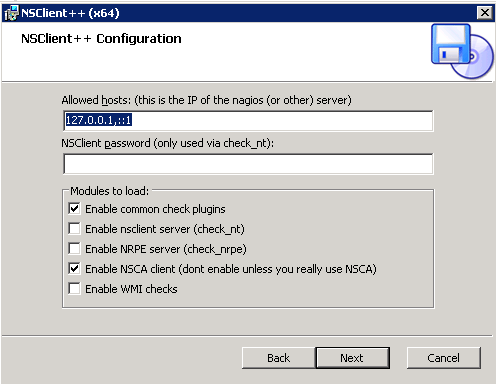
Una volta completata l’installazione si può procedere con la configurazione di NSClient++, editando il file nsclient.ini presente nella directory C:\Program Files\NSclient++ ed il cui contenuto dovrebbe essere simile al seguente:

 # If you want to fill this file with all avalible options run the following command:
#   nscp settings --generate --add-defaults --load-all
# If you want to activate a module and bring in all its options use:
#   nscp settings --activate-module <MODULE NAME> --add-defaults
# For details run: nscp settings --help

; Undocumented section
[/settings/default]

; Undocumented key
password = vostrapassword

; Undocumented key
allowed hosts = 127.0.0.1,::1

; Undocumented section
[/modules]

;moduli da abilitare
CheckEventLog=1
NSCAClient = 1

[/settings/eventlog/real-time]
enabled=1
debug=1
log=Application,Security
destination=NSCA
startup age=30m

[/settings/eventlog/real-time/filters/logon-failed]
filter= id = 4625 
severity= WARNING

[/settings/NSCA/client]
hostname=Server-Windows-RDP

[/settings/NSCA/client/targets/default]
address=nsca://indirizzoNMS:5667
encryption=3des
password=vostrapassword

In particolare, nella sezione [/modules] vengono specificati i moduli di NSClient++ da caricare, ovvero CheckEventLog ed NSCAClient (il primo serve per il monitoraggio in tempo reale degli eventi ed il secondo per l’inoltro degli stessi all’NMS).

Nella sezione [/settings/eventlog/real-time] vengono definiti i parametri generali per il monitoraggio degli eventi, tra cui i log di cui tenere traccia (Application e Security) ed a chi devono essere inoltrati (destination=NSCA). Inoltre, solo durante una prima fase di testing, è opportuno abilitare la modalità debug (debug=1), soprattutto per verificare il corretto funzionamento dei filtri da noi definiti.

Nella sezione [/settings/eventlog/real-time/filters/logon-failed] (dove logon-failed non è altro che il nome del servizio associato all’host da monitorare e presente nello specifico file di configurazione di Nagios) viene indicato il filtro da utilizzare per l’identificazione dell’evento (filter=ID = 4625, ovvero logon failure) e la severity dell’alert generato da Nagios (severity= WARNING).

In [/settings/NSCA/client] viene definito l’hostname del server da monitorare (hostname=Server-Windows-RDP), il quale deve coincidere con quello definito nel file di configurazione di Nagios.

Infine, in [/settings/NSCA/client/targets/default] vengono indicati i parametri di connessione al nostro NMS (su cui è attivo il server NSCA), quali URL (address=nsca://indirizzoNMS:5667), modalità di cicfratura simmetrica (encryption=3des) e password (password=vostrapassword). Da notare che, inizialmente, avevo scelto come metodo di cifratura AES256 lato client e RIJNDAEL-256 lato server, ma l’autenticazione falliva costantemente, ragion per cui ho dovuto optare per il triplo des.

Avviamo quindi il servizio nscp mediante il comando:

C:\Users\Administrator>net start nscp

e passiamo alla configurazione dell’NMS.

Installazione e configurazione di NSCA Server

La macchina su cui è attivo Nagios è una CentOS 6.4 a 64 bit ergo, per installare NSCA Server (nella sua ultima versione stabile, ovvero la 2.7.2), è sufficiente lanciare il comando:

[root@nms ~]# yum install nagios-nsca

Una volta installato, occorre configurarlo edintando il file /etc/nagios/nsca.cnf, il cui contenuto dovrà essere simile al seguente:

pid_file=/var/run/nsca.pid

server_port=5667

nsca_user=nagios

nsca_group=nagios

debug=1

command_file=/var/spool/nagios/cmd/nagios.cmd

alternate_dump_file=/var/spool/nagios/nsca.dump

aggregate_writes=0

append_to_file=0

max_packet_age=30

password=vostrapassword

decryption_method=3

Dove il decryption method 3 non è altro che il triplo des. Ovviamente, affinchè client e server possano “capirsi”, è necessario che decryption method e password coincidano su entrambi i fronti.

Infine, avviamo il servizio in questione digitando:

[root@nms ~]# service nsca start

Configurazione di Nagios

L’ultimo step consiste nella configurazione di un servizio di tipo passivo relativo all’host monitorato da Nagios. Editiamo quindi il file /etc/nagios/object/Server-Windows-RDP.cfg aggiungendo il servizio logon-failed, il quale avrà la seguente struttura:

define service{
        use                             local-service
        host_name                       Server-Windows-RDP
        service_descripion             logon-failed
        check_command                   check_passive
        passive_checks_enabled          1
        active_checks_enabled           0
        max_check_attempts              1
        is_volatile                     1
        check_freshness                 1
        freshness_threshold             600
        flap_detection_enabled          0
        }

Ricarichiamo la configurazione del nostro NMS per rendere effettive le suddette modifiche:

[root@nms ~]# service nagios reload

ed abbiamo finito.

Considerazioni finali

Prima di chiedere il post occorre fare qualche precisazione:

1) Non sono un fan di NSCP,  sia perchè vi sono continui cambi di sintassi tra minor release (soprattutto per ciò che concerne la definizione dei filtri) che per la presenza di qualche baco più o meno grave. Ad esempio, ho notato che nella versione 0.5.0, l’inserimento di record all’interno del log degli eventi di Windows (creati ad hoc mediante il comando nscp eventlog insert) non funziona (come alternativa ho dovuto utilizzare l’applet write-eventlog di PowerShell).

2) E’ necessario che la versione del client NSCA sia identica a quella del server, pena l’impossibilità di ricevere gli eventi (CRC error).

3) Sia lato client che lato server il payload massimo degli eventi è pari a 512 byte (limite superato abbondatemente nella versione unstable 2.9.1 e portato a 4096 byte). Ciò comporta la possibile perdita di parte dell’output (ovvero tutto ciò che eccede i 512 byte). Esiste comunque una direttiva (lato client) in grado di innalzare il suddetto limite (payload length), ma per farla funzionare è necessario modificare il contenuto della libreria common.h prima della compilazione da sorgente. Quest’ultima operazione risulta essere abbastanza semplice se si ha a che fare con i sorgenti *NIX (#define MAX_PLUGINOUTPUT_LENGTH 4096) ma molto più tediosa nel caso dei sorgenti Windows.

Il post termina qui.

Alla prossima.

NRPE_NT e Nagios: script PowerShell per il controllo dell’uptime su Windows Server 2008 R2

Tenere sotto controllo l’uptime dei nostri server è molto importante, soprattutto se si ha a che fare con macchine in produzione. Per ciò che concerne i sistemi operativi di casa Microsoft (sia client che server), esiste un comando che può tornarci molto utile allo scopo, ovvero:

net stats srv

il quale, basandosi sul servizio Server di Windows, colleziona e fornisce tutta una serie di informazioni associate alla nostra macchina, tra cui, per l’appunto, il suo tempo di attività:

Statistics since 7/11/2016 9:21:08 AM

powershellAffinchè il suddetto task possa essere effettuato in automatico dal nostro NMS (Nagios), è necessario utilizzare uno scrip (get_uptime.ps1, creato da me allo scopo) da integrare al servizio NRPE_NT. Per ragioni di semplicità e comodità ho deciso di avvalermi di Windows PowerShell per la stesura dello stesso, il cui contenuto è il seguente:

$critical = $Args[0]
$warning = $Args[1]

if ($warning -and $critical) #both variable are defined and not empty
{
    if ($critical -lt $warning)
    {
        $os = Get-WmiObject win32_operatingsystem
        $uptime = (Get-Date) - ($os.ConvertToDateTime($os.lastbootuptime))
        $minutes_to_seconds = $Uptime.Minutes*60
        $hours_to_seconds = $Uptime.Hours*3600
        $days_to_seconds = $Uptime.Days*86400
        $uptime_in_seconds = $minutes_to_seconds + $hours_to_seconds + $days_to_seconds
        if ($uptime_in_seconds -gt $critical -and $uptime_in_seconds -gt $warning)
        {
            $Display = "OK: System Uptime is " + $Uptime.Days + " days, " + $Uptime.Hours + " hours, " + $Uptime.Minutes + " minutes"
            Write-Output $Display
            exit 0
        }
        elseif ($uptime_in_seconds -gt $critical -and $uptime_in_seconds -le $warning)
        {
            $Display = "WARNING: System Uptime is " + $Uptime.Days + " days, " + $Uptime.Hours + " hours, " + $Uptime.Minutes + " minutes"
            Write-Output $Display
            exit 1
        }
        else
        {
            $Display = "CRITICAL: System Uptime is " + $Uptime.Days + " days, " + $Uptime.Hours + " hours, " + $Uptime.Minutes + " minutes"
            Write-Output $Display
            exit 2
        }
    }
    else
    {
        $Usage = "Usage: .\get_uptime.ps1 <critical threshold in seconds> <warning threshold in seconds>"
        $Error1 = "Warning threshold must be greater then the critical one"
        Write-Output $Usage
        Write-Output $Error1
        exit 3
    }
}
else
{
    $Usage = "Usage: .\get_uptime.ps1 <critical threshold in seconds> <warning threshold in seconds>"
    $Error2 = "Warning threshold and critical threshold must be defined"
    Write-Output $Usage
    Write-Output $Error2
    exit 3
}

In soldoni, il suddetto scrip riceve due argomenti da linea di comando, ovvero la soglia critica e quella di warning, espresse entrambe in secondi. Ovviamente, trattandosi di tempo di attività, la prima deve essere strettamente minore della seconda.

Configurazione di NRPE_NT

Salviamo tale scrip all’interno della directory C:\nrpe\Plugins\V2 e successivamente editiamo il file C:\nrpe\Plugins\V2\V2_nrpe_commands.cfg, aggiungendo la seguente direttiva:

# =================================
# Windows System Uptime checks
# =================================

command[get_system_uptime]=cmd.exe /c echo C:\nrpe\Plugins\V2\get_uptime.ps1 "$ARG1$" "$ARG2$" | powershell.exe -ExecutionPolicy Bypass -NoLogo -NonInteractive -NoProfile -command -

In particolare, stiamo definendo il comando get_system_uptime che si avvarrà di get_uptime.ps1 per l’individuazione del tempo di attività.

Occorre precisare che l’esecuzione dello scrip non può avvenire richiamando direttamente l’eseguibile powershell.exe, ma deve prima passare per cmd.exe (il cui output, mediante pipe, viene dato in pasto a PowerShell grazie alla direttiva -command –, dove il finale rappresenta “tutto ciò che proviene dal pipe”). Inoltre, si rende indispensabile bypassare l’executionpolicy di PowerShell, consentendo ad NRPE_NT di lanciare get_uptime.ps1 senza restrizioni.

Infine, riavviamo NRPE_NT per rendere effettive le suddette modifiche:

C:\Users\Administrator> net stop nrpe_nt
C:\Users\Administrator> net start nrpe_nt

Configurazione di Nagios

Per prima cosa è necessario creare un apposito comando all’interno del file /etc/nagios/object/commands.cfg:

# nagios-Windows-uptime check command definition

define command {
        command_name    check_Windows_uptime
        command_line    /usr/lib64/nagios/plugins/check_nrpe -H $HOSTADDRESS$ -t $ARG1$ -c get_system_uptime -a $ARG2$ $ARG3$
        }

Successivamente, all’interno del file che rappresenta l’host da monitorare, è necessario aggiungere un servizio specifico che si avvale del suddetto comando:

define service{
        use                             generic-service         ; Name of service template to use
        host_name                       Windows-Server
        service_descripion             query Windows System Uptime for Microsoft Windows Machine
        check_command                   check_Windows_uptime!30!60!900
        }

Ricarichiamo la configurazione di Nagios:

[root@linuxbox ~]# service nagios reload

ed abbiamo finito.

Alla prossima.

Windows Server 2008 R2: installare e configurare ClamD come servizio

Scenario

Macchina Windows Server 2008 R2 adibito a server di posta (inbound/outbound) mediante hMailServer. Su quest’ultimo si vuole utilizzare ClamD (eseguibile appartenente alla suite ClamAV) per la scansione degli allegati (poichè più stabile e performante di ClamWin).

clamavIn questo post vedremo come installare il suddetto applicativo sottoforma di servizio. Inoltre, tramite il task scheduler di Windows, utilizzeremo uno scrip custom (da me creato) per il download e l’installazione degli aggiornamenti.

Download e configurazione di ClamAV

E’ possibile scaricare il software il questione da qui (è gratis). La versione da me utilizzata è la Win64 (poichè il SO è a 64 bit).

Una volta completato il download, estraiamo il contenuto del file *.zip (ho scelto questa tipologia di file anzichè il *.msi per avere un maggiore controllo durante la fase di installazione e configurazione) e rinominiamo la dir in ClamAV. Infine, copiamola all’interno di C:\Program Files\.

Posizioniamoci dunque all’interno della directory C:\Program Files\ClamAV e creiamo la cartella database (in cui verranno salvate le firme aggiornate) ed i file clamd.conf:

##
## Example config file for the Clam AV daemon
## Please read the clamd.conf(5) manual before editing this file.
##

# Comment or remove the line below.
#Example

# Uncomment this option to enable logging.
# LogFile must be writable for the user running daemon.
# A full path is required.
# Default: disabled
LogFile C:\Program Files\ClamAV\clamd.log

# By default the log file is locked for writing - the lock protects against
# running clamd multiple times (if want to run another clamd, please
# copy the configuration file, change the LogFile variable, and run
# the daemon with --config-file option).
# This option disables log file locking.
# Default: no
#LogFileUnlock yes

# Maximum size of the log file.
# Value of 0 disables the limit.
# You may use 'M' or 'm' for megabytes (1M = 1m = 1048576 bytes)
# and 'K' or 'k' for kilobytes (1K = 1k = 1024 bytes). To specify the size
# in bytes just don't use modifiers. If LogFileMaxSize is enabled, log
# rotation (the LogRotate option) will always be enabled.
# Default: 1M
LogFileMaxSize 2M

# Log time with each message.
# Default: no
LogTime yes

# Also log clean files. Useful in debugging but drastically increases the
# log size.
# Default: no
LogClean yes

# Use system logger (can work together with LogFile).
# Default: no
#LogSyslog yes

# Specify the type of syslog messages - please refer to 'man syslog'
# for facility names.
# Default: LOG_LOCAL6
#LogFacility LOG_MAIL

# Enable verbose logging.
# Default: no
LogVerbose yes

# Enable log rotation. Always enabled when LogFileMaxSize is enabled.
# Default: no
#LogRotate yes

# Log additional information about the infected file, such as its
# size and hash, together with the virus name.
ExtendedDetectionInfo yes

# This option allows you to save a process identifier of the listening
# daemon (main thread).
# Default: disabled
#PidFile /var/run/clamd.pid

# Optional path to the global temporary directory.
# Default: system specific (usually /tmp or /var/tmp).
#TemporaryDirectory /var/tmp

# Path to the database directory.
# Default: hardcoded (depends on installation options)
#DatabaseDirectory /var/lib/clamav

# Only load the official signatures published by the ClamAV project.
# Default: no
#OfficialDatabaseOnly no

# The daemon can work in local mode, network mode or both. 
# Due to security reasons we recommend the local mode.

# Path to a local socket file the daemon will listen on.
# Default: disabled (must be specified by a user)
#LocalSocket /tmp/clamd.socket

# Sets the group ownership on the unix socket.
# Default: disabled (the primary group of the user running clamd)
#LocalSocketGroup virusgroup

# Sets the permissions on the unix socket to the specified mode.
# Default: disabled (socket is world accessible)
#LocalSocketMode 660

# Remove stale socket after unclean shutdown.
# Default: yes
#FixStaleSocket yes

# TCP port address.
# Default: no
TCPSocket 3310

# TCP address.
# By default we bind to INADDR_ANY, probably not wise.
# Enable the following to provide some degree of protection
# from the outside world. This option can be specified multiple
# times if you want to listen on multiple IPs. IPv6 is now supported.
# Default: no
TCPAddr 127.0.0.1

# Maximum length the queue of pending connections may grow to.
# Default: 200
#MaxConnectionQueueLength 30

# Clamd uses FTP-like protocol to receive data from remote clients.
# If you are using clamav-milter to balance load between remote clamd daemons
# on firewall servers you may need to tune the options below.

# Close the connection when the data size limit is exceeded.
# The value should match your MTA's limit for a maximum attachment size.
# Default: 25M
#StreamMaxLength 10M

# Limit port range.
# Default: 1024
#StreamMinPort 30000
# Default: 2048
#StreamMaxPort 32000

# Maximum number of threads running at the same time.
# Default: 10
#MaxThreads 20

# Waiting for data from a client socket will timeout after this time (seconds).
# Default: 120
#ReadTimeout 300

# This option specifies the time (in seconds) after which clamd should
# timeout if a client doesn't provide any initial command after connecting.
# Default: 5
#CommandReadTimeout 5

# This option specifies how long to wait (in miliseconds) if the send buffer is full.
# Keep this value low to prevent clamd hanging
#
# Default: 500
#SendBufTimeout 200

# Maximum number of queued items (including those being processed by MaxThreads threads)
# It is recommended to have this value at least twice MaxThreads if possible.
# WARNING: you shouldn't increase this too much to avoid running out  of file descripors,
# the following condition should hold:
# MaxThreads*MaxRecursion + (MaxQueue - MaxThreads) + 6< RLIMIT_NOFILE (usual max is 1024)
#
# Default: 100
#MaxQueue 200

# Waiting for a new job will timeout after this time (seconds).
# Default: 30
#IdleTimeout 60

# Don't scan files and directories matching regex
# This directive can be used multiple times
# Default: scan all
#ExcludePath ^/proc/
#ExcludePath ^/sys/

# Maximum depth directories are scanned at.
# Default: 15
#MaxDirectoryRecursion 20

# Follow directory symlinks.
# Default: no
#FollowDirectorySymlinks yes

# Follow regular file symlinks.
# Default: no
#FollowFileSymlinks yes

# Scan files and directories on other filesystems.
# Default: yes
#CrossFilesystems yes

# Perform a database check.
# Default: 600 (10 min)
#SelfCheck 600

# Execute a command when virus is found. In the command string %v will
# be replaced with the virus name.
# Default: no
#VirusEvent /usr/local/bin/send_sms 123456789 "VIRUS ALERT: %v"

# Run as another user (clamd must be started by root for this option to work)
# Default: don't drop privileges
#User clamav

# Initialize supplementary group access (clamd must be started by root).
# Default: no
#AllowSupplementaryGroups no

# Stop daemon when libclamav reports out of memory condition.
#ExitOnOOM yes

# Don't fork into background.
# Default: no
#Foreground yes

# Enable debug messages in libclamav.
# Default: no
#Debug yes

# Do not remove temporary files (for debug purposes).
# Default: no
#LeaveTemporaryFiles yes

# Permit use of the ALLMATCHSCAN command. If set to no, clamd will reject
# any ALLMATCHSCAN command as invalid.
# Default: yes
#AllowAllMatchScan no

# Detect Possibly Unwanted Applications.
# Default: no
#DetectPUA yes

# Exclude a specific PUA category. This directive can be used multiple times.
# See https://github.com/vrtadmin/clamav-faq/blob/master/faq/faq-pua.md for 
# the complete list of PUA categories.
# Default: Load all categories (if DetectPUA is activated)
#ExcludePUA NetTool
#ExcludePUA PWTool

# Only include a specific PUA category. This directive can be used multiple
# times.
# Default: Load all categories (if DetectPUA is activated)
#IncludePUA Spy
#IncludePUA Scanner
#IncludePUA RAT

# In some cases (eg. complex malware, exploits in graphic files, and others),
# ClamAV uses special algorithms to provide accurate detection. This option
# controls the algorithmic detection.
# Default: yes
#AlgorithmicDetection yes

# This option causes memory or nested map scans to dump the content to disk.
# If you turn on this option, more data is written to disk and is available
# when the LeaveTemporaryFiles option is enabled.
#ForceToDisk yes

# This option allows you to disable the caching feature of the engine. By
# default, the engine will store an MD5 in a cache of any files that are
# not flagged as virus or that hit limits checks. Disabling the cache will
# have a negative performance impact on large scans.
# Default: no
#DisableCache yes

##
## Executable files
##

# PE stands for Portable Executable - it's an executable file format used
# in all 32 and 64-bit versions of Windows operating systems. This option allows
# ClamAV to perform a deeper analysis of executable files and it's also
# required for decompression of popular executable packers such as UPX, FSG,
# and Petite. If you turn off this option, the original files will still be
# scanned, but without additional processing.
# Default: yes
#ScanPE yes

# Certain PE files contain an authenticode signature. By default, we check
# the signature chain in the PE file against a database of trusted and
# revoked certificates if the file being scanned is marked as a virus.
# If any certificate in the chain validates against any trusted root, but
# does not match any revoked certificate, the file is marked as whitelisted.
# If the file does match a revoked certificate, the file is marked as virus.
# The following setting completely turns off authenticode verification.
# Default: no
#DisableCertCheck yes

# Executable and Linking Format is a standard format for UN*X executables.
# This option allows you to control the scanning of ELF files.
# If you turn off this option, the original files will still be scanned, but
# without additional processing.
# Default: yes
#ScanELF yes

# With this option clamav will try to detect broken executables (both PE and
# ELF) and mark them as Broken.Executable.
# Default: no
#DetectBrokenExecutables yes

##
## Documents
##

# This option enables scanning of OLE2 files, such as Microsoft Office
# documents and .msi files.
# If you turn off this option, the original files will still be scanned, but
# without additional processing.
# Default: yes
#ScanOLE2 yes

# With this option enabled OLE2 files with VBA macros, which were not
# detected by signatures will be marked as "Heuristics.OLE2.ContainsMacros".
# Default: no
#OLE2BlockMacros no

# This option enables scanning within PDF files.
# If you turn off this option, the original files will still be scanned, but
# without decoding and additional processing.
# Default: yes
#ScanPDF yes

# This option enables scanning within SWF files.
# If you turn off this option, the original files will still be scanned, but
# without decoding and additional processing.
# Default: yes
#ScanSWF yes

##
## Mail files
##

# Enable internal e-mail scanner.
# If you turn off this option, the original files will still be scanned, but
# without parsing individual messages/attachments.
# Default: yes
#ScanMail yes

# Scan RFC1341 messages split over many emails.
# You will need to periodically clean up $TemporaryDirectory/clamav-partial directory.
# WARNING: This option may open your system to a DoS attack.
#       Never use it on loaded servers.
# Default: no
#ScanPartialMessages yes

# With this option enabled ClamAV will try to detect phishing attempts by using
# signatures.
# Default: yes
#PhishingSignatures yes

# Scan URLs found in mails for phishing attempts using heuristics.
# Default: yes
#PhishingScanURLs yes

# Always block SSL mismatches in URLs, even if the URL isn't in the database.
# This can lead to false positives.
#
# Default: no
#PhishingAlwaysBlockSSLMismatch no

# Always block cloaked URLs, even if URL isn't in database.
# This can lead to false positives.
#
# Default: no
#PhishingAlwaysBlockCloak no

# Detect partition intersections in raw disk images using heuristics.
# Default: no
#PartitionIntersection no

# Allow heuristic match to take precedence.
# When enabled, if a heuristic scan (such as phishingScan) detects
# a possible virus/phish it will stop scan immediately. Recommended, saves CPU
# scan-time.
# When disabled, virus/phish detected by heuristic scans will be reported only at
# the end of a scan. If an archive contains both a heuristically detected
# virus/phish, and a real malware, the real malware will be reported
#
# Keep this disabled if you intend to handle "*.Heuristics.*" viruses 
# differently from "real" malware.
# If a non-heuristically-detected virus (signature-based) is found first, 
# the scan is interrupted immediately, regardless of this config option.
#
# Default: no
#HeuristicScanPrecedence yes

##
## Data Loss Prevention (DLP)
##

# Enable the DLP module
# Default: No
#StructuredDataDetection yes

# This option sets the lowest number of Credit Card numbers found in a file
# to generate a detect.
# Default: 3
#StructuredMinCreditCardCount 5

# This option sets the lowest number of Social Security Numbers found
# in a file to generate a detect.
# Default: 3
#StructuredMinSSNCount 5

# With this option enabled the DLP module will search for valid
# SSNs formatted as xxx-yy-zzzz
# Default: yes
#StructuredSSNFormatNormal yes

# With this option enabled the DLP module will search for valid
# SSNs formatted as xxxyyzzzz
# Default: no
#StructuredSSNFormatStripped yes

##
## HTML
##

# Perform HTML normalisation and decryption of MS scrip Encoder code.
# Default: yes
# If you turn off this option, the original files will still be scanned, but
# without additional processing.
#ScanHTML yes

##
## Archives
##

# ClamAV can scan within archives and compressed files.
# If you turn off this option, the original files will still be scanned, but
# without unpacking and additional processing.
# Default: yes
#ScanArchive yes

# Mark encrypted archives as viruses (Encrypted.Zip, Encrypted.RAR).
# Default: no
#ArchiveBlockEncrypted no

##
## Limits
##

# The options below protect your system against Denial of Service attacks
# using archive bombs.

# This option sets the maximum amount of data to be scanned for each input file.
# Archives and other containers are recursively extracted and scanned up to this
# value.
# Value of 0 disables the limit
# Note: disabling this limit or setting it too high may result in severe damage
# to the system.
# Default: 100M
#MaxScanSize 150M

# Files larger than this limit won't be scanned. Affects the input file itself
# as well as files contained inside it (when the input file is an archive, a
# document or some other kind of container).
# Value of 0 disables the limit.
# Note: disabling this limit or setting it too high may result in severe damage
# to the system.
# Default: 25M
#MaxFileSize 30M

# Nested archives are scanned recursively, e.g. if a Zip archive contains a RAR
# file, all files within it will also be scanned. This options specifies how
# deeply the process should be continued.
# Note: setting this limit too high may result in severe damage to the system.
# Default: 16
#MaxRecursion 10

# Number of files to be scanned within an archive, a document, or any other
# container file.
# Value of 0 disables the limit.
# Note: disabling this limit or setting it too high may result in severe damage
# to the system.
# Default: 10000
#MaxFiles 15000

# Maximum size of a file to check for embedded PE. Files larger than this value
# will skip the additional analysis step.
# Note: disabling this limit or setting it too high may result in severe damage
# to the system.
# Default: 10M
#MaxEmbeddedPE 10M

# Maximum size of a HTML file to normalize. HTML files larger than this value
# will not be normalized or scanned.
# Note: disabling this limit or setting it too high may result in severe damage
# to the system.
# Default: 10M
#MaxHTMLNormalize 10M

# Maximum size of a normalized HTML file to scan. HTML files larger than this
# value after normalization will not be scanned.
# Note: disabling this limit or setting it too high may result in severe damage
# to the system.
# Default: 2M
#MaxHTMLNoTags 2M

# Maximum size of a scrip file to normalize. scrip content larger than this
# value will not be normalized or scanned.
# Note: disabling this limit or setting it too high may result in severe damage
# to the system.
# Default: 5M
#MaxscripNormalize 5M

# Maximum size of a ZIP file to reanalyze type recognition. ZIP files larger
# than this value will skip the step to potentially reanalyze as PE.
# Note: disabling this limit or setting it too high may result in severe damage
# to the system.
# Default: 1M
#MaxZipTypeRcg 1M

# This option sets the maximum number of partitions of a raw disk image to be scanned.
# Raw disk images with more partitions than this value will have up to the value number
# partitions scanned. Negative values are not allowed.
# Note: setting this limit too high may result in severe damage or impact performance.
# Default: 50
#MaxPartitions 128

# This option sets the maximum number of icons within a PE to be scanned.
# PE files with more icons than this value will have up to the value number icons scanned.
# Negative values are not allowed.
# WARNING: setting this limit too high may result in severe damage or impact performance.
# Default: 100
#MaxIconsPE 200

# This option sets the maximum calls to the PCRE match function during an instance of regex matching.
# Instances using more than this limit will be terminated and alert the user but the scan will continue.
# For more information on match_limit, see the PCRE documentation.
# Negative values are not allowed.
# WARNING: setting this limit too high may severely impact performance.
# Default: 10000
#PCREMatchLimit 20000

# This option sets the maximum recursive calls to the PCRE match function during an instance of regex matching.
# Instances using more than this limit will be terminated and alert the user but the scan will continue.
# For more information on match_limit_recursion, see the PCRE documentation.
# Negative values are not allowed and values > PCREMatchLimit are superfluous.
# WARNING: setting this limit too high may severely impact performance.
# Default: 5000
#PCRERecMatchLimit 10000

# This option sets the maximum filesize for which PCRE subsigs will be executed.
# Files exceeding this limit will not have PCRE subsigs executed unless a subsig is encompassed to a smaller buffer.
# Negative values are not allowed.
# Setting this value to zero disables the limit.
# WARNING: setting this limit too high or disabling it may severely impact performance.
# Default: 25M
#PCREMaxFileSize 100M

##
## On-access Scan Settings
##

# Enable on-access scanning. Currently, this is supported via fanotify.
# Clamuko/Dazuko support has been deprecated.
# Default: no
#ScanOnAccess yes

# Set the  mount point to be scanned. The mount point specified, or the mount point 
# containing the specified directory will be watched. If any directories are specified, 
# this option will preempt the DDD system. This will notify only. It can be used multiple times.
# (On-access scan only)
# Default: disabled
#OnAccessMountPath /
#OnAccessMountPath /home/user

# Don't scan files larger than OnAccessMaxFileSize
# Value of 0 disables the limit.
# Default: 5M
#OnAccessMaxFileSize 10M

# Set the include paths (all files inside them will be scanned). You can have
# multiple OnAccessIncludePath directives but each directory must be added
# in a separate line. (On-access scan only)
# Default: disabled
#OnAccessIncludePath /home
#OnAccessIncludePath /students

# Set the exclude paths. All subdirectories are also excluded.
# (On-access scan only)
# Default: disabled
#OnAccessExcludePath /home/bofh

# With this option you can whitelist specific UIDs. Processes with these UIDs
# will be able to access all files.
# This option can be used multiple times (one per line).
# Default: disabled
#OnAccessExcludeUID 0

# Toggles dynamic directory determination. Allows for recursively watching include paths.
# (On-access scan only)
# Default: no
#OnAccessDisableDDD yes

# Modifies fanotify blocking behaviour when handling permission events.
# If off, fanotify will only notify if the file scanned is a virus,
# and not perform any blocking.
# (On-access scan only)
# Default: no
#OnAccessPrevention yes

# Toggles extra scanning and notifications when a file or directory is created or moved.
# Requires the  DDD system to kick-off extra scans.
# (On-access scan only)
# Default: no
#OnAccessExtraScanning yes

##
## Bytecode
##

# With this option enabled ClamAV will load bytecode from the database. 
# It is highly recommended you keep this option on, otherwise you'll miss detections for many new viruses.
# Default: yes
#Bytecode yes

# Set bytecode security level.
# Possible values:
#       None - no security at all, meant for debugging. DO NOT USE THIS ON PRODUCTION SYSTEMS
#         This value is only available if clamav was built with --enable-debug!
#       TrustSigned - trust bytecode loaded from signed .c[lv]d files,
#                insert runtime safety checks for bytecode loaded from other sources
#       Paranoid - don't trust any bytecode, insert runtime checks for all
# Recommended: TrustSigned, because bytecode in .cvd files already has these checks
# Note that by default only signed bytecode is loaded, currently you can only
# load unsigned bytecode in --enable-debug mode.
#
# Default: TrustSigned
#BytecodeSecurity TrustSigned

# Set bytecode timeout in miliseconds.
# 
# Default: 5000
# BytecodeTimeout 1000

##
## Statistics gathering and submitting
##

# Enable statistical reporting.
# Default: no
#StatsEnabled yes

# Disable submission of individual PE sections for files flagged as malware.
# Default: no
#StatsPEDisabled yes

# HostID in the form of an UUID to use when submitting statistical information.
# Default: auto
#StatsHostID auto

# Time in seconds to wait for the stats server to come back with a response
# Default: 10
#StatsTimeout 10

e freshclam.conf:

##
## Example config file for freshclam
## Please read the freshclam.conf(5) manual before editing this file.
##

# Comment or remove the line below.
#Example

# Path to the database directory.
# WARNING: It must match clamd.conf's directive!
# Default: hardcoded (depends on installation options)
#DatabaseDirectory /var/lib/clamav

# Path to the log file (make sure it has proper permissions)
# Default: disabled
UpdateLogFile C:\Program Files (x86)\ClamAV\freshclam.log

# Maximum size of the log file.
# Value of 0 disables the limit.
# You may use 'M' or 'm' for megabytes (1M = 1m = 1048576 bytes)
# and 'K' or 'k' for kilobytes (1K = 1k = 1024 bytes).
# in bytes just don't use modifiers. If LogFileMaxSize is enabled,
# log rotation (the LogRotate option) will always be enabled.
# Default: 1M
#LogFileMaxSize 2M

# Log time with each message.
# Default: no
#LogTime yes

# Enable verbose logging.
# Default: no
#LogVerbose yes

# Use system logger (can work together with UpdateLogFile).
# Default: no
#LogSyslog yes

# Specify the type of syslog messages - please refer to 'man syslog'
# for facility names.
# Default: LOG_LOCAL6
#LogFacility LOG_MAIL

# Enable log rotation. Always enabled when LogFileMaxSize is enabled.
# Default: no
#LogRotate yes

# This option allows you to save the process identifier of the daemon
# Default: disabled
#PidFile /var/run/freshclam.pid

# By default when started freshclam drops privileges and switches to the
# "clamav" user. This directive allows you to change the database owner.
# Default: clamav (may depend on installation options)
#DatabaseOwner clamav

# Initialize supplementary group access (freshclam must be started by root).
# Default: no
#AllowSupplementaryGroups yes

# Use DNS to verify virus database version. Freshclam uses DNS TXT records
# to verify database and software versions. With this directive you can change
# the database verification domain.
# WARNING: Do not touch it unless you're configuring freshclam to use your
# own database verification domain.
# Default: current.cvd.clamav.net
#DNSDatabaseInfo current.cvd.clamav.net

# Uncomment the following line and replace XY with your country
# code. See http://www.iana.org/cctld/cctld-whois.htm for the full list.
# You can use db.XY.ipv6.clamav.net for IPv6 connections.
#DatabaseMirror db.XY.clamav.net

# database.clamav.net is a round-robin record which points to our most 
# reliable mirrors. It's used as a fall back in case db.XY.clamav.net is 
# not working. DO NOT TOUCH the following line unless you know what you
# are doing.
DatabaseMirror database.clamav.net

# How many attempts to make before giving up.
# Default: 3 (per mirror)
#MaxAttempts 5

# With this option you can control scriped updates. It's highly recommended
# to keep it enabled.
# Default: yes
#scripedUpdates yes

# By default freshclam will keep the local databases (.cld) uncompressed to
# make their handling faster. With this option you can enable the compression;
# the change will take effect with the next database update.
# Default: no
#CompressLocalDatabase no

# With this option you can provide custom sources (http:// or file://) for
# database files. This option can be used multiple times.
# Default: no custom URLs
#DatabaseCustomURL http://myserver.com/mysigs.ndb
#DatabaseCustomURL file:///mnt/nfs/local.hdb

# This option allows you to easily point freshclam to private mirrors.
# If PrivateMirror is set, freshclam does not attempt to use DNS
# to determine whether its databases are out-of-date, instead it will
# use the If-Modified-Since request or directly check the headers of the
# remote database files. For each database, freshclam first attempts
# to download the CLD file. If that fails, it tries to download the
# CVD file. This option overrides DatabaseMirror, DNSDatabaseInfo
# and scripedUpdates. It can be used multiple times to provide
# fall-back mirrors.
# Default: disabled
#PrivateMirror mirror1.mynetwork.com
#PrivateMirror mirror2.mynetwork.com

# Number of database checks per day.
# Default: 12 (every two hours)
#Checks 24

# Proxy settings
# Default: disabled
#HTTPProxyServer myproxy.com
#HTTPProxyPort 1234
#HTTPProxyUsername myusername
#HTTPProxyPassword mypass

# If your servers are behind a firewall/proxy which applies User-Agent
# filtering you can use this option to force the use of a different
# User-Agent header.
# Default: clamav/version_number
#HTTPUserAgent SomeUserAgentIdString

# Use aaa.bbb.ccc.ddd as client address for downloading databases. Useful for
# multi-homed systems.
# Default: Use OS'es default outgoing IP address.
#LocalIPAddress aaa.bbb.ccc.ddd

# Send the RELOAD command to clamd.
# Default: no
#NotifyClamd /path/to/clamd.conf

# Run command after successful database update.
# Default: disabled
#OnUpdateExecute command

# Run command when database update process fails.
# Default: disabled
#OnErrorExecute command

# Run command when freshclam reports outdated version.
# In the command string %v will be replaced by the new version number.
# Default: disabled
#OnOutdatedExecute command

# Don't fork into background.
# Default: no
#Foreground yes

# Enable debug messages in libclamav.
# Default: no
#Debug yes

# Timeout in seconds when connecting to database server.
# Default: 30
#ConnectTimeout 60

# Timeout in seconds when reading from database server.
# Default: 30
#ReceiveTimeout 60

# With this option enabled, freshclam will attempt to load new
# databases into memory to make sure they are properly handled
# by libclamav before replacing the old ones.
# Default: yes
#TestDatabases yes

# When enabled freshclam will submit statistics to the ClamAV Project about
# the latest virus detections in your environment. The ClamAV maintainers
# will then use this data to determine what types of malware are the most
# detected in the field and in what geographic area they are.
# Freshclam will connect to clamd in order to get recent statistics.
# Default: no
#SubmitDetectionStats /path/to/clamd.conf

# Country of origin of malware/detection statistics (for statistical
# purposes only). The statistics collector at ClamAV.net will look up
# your IP address to determine the geographical origin of the malware
# reported by your installation. If this installation is mainly used to
# scan data which comes from a different location, please enable this
# option and enter a two-letter code (see http://www.iana.org/domains/root/db/)
# of the country of origin.
# Default: disabled
#DetectionStatsCountry country-code

# This option enables support for our "Personal Statistics" service. 
# When this option is enabled, the information on malware detected by
# your clamd installation is made available to you through our website.
# To get your HostID, log on http://www.stats.clamav.net and add a new
# host to your host list. Once you have the HostID, uncomment this option
# and paste the HostID here. As soon as your freshclam starts submitting
# information to our stats collecting service, you will be able to view
# the statistics of this clamd installation by logging into
# http://www.stats.clamav.net with the same credentials you used to
# generate the HostID. For more information refer to:
# http://www.clamav.net/documentation.html#cctts 
# This feature requires SubmitDetectionStats to be enabled.
# Default: disabled
#DetectionStatsHostID unique-id

# This option enables support for Google Safe Browsing. When activated for
# the first time, freshclam will download a new database file (safebrowsing.cvd)
# which will be automatically loaded by clamd and clamscan during the next
# reload, provided that the heuristic phishing detection is turned on. This
# database includes information about websites that may be phishing sites or
# possible sources of malware. When using this option, it's mandatory to run
# freshclam at least every 30 minutes.
# Freshclam uses the ClamAV's mirror infrastructure to distribute the
# database and its updates but all the contents are provided under Google's
# terms of use. See http://www.google.com/transparencyreport/safebrowsing
# and http://www.clamav.net/documentation.html#safebrowsing 
# for more information.
# Default: disabled
#SafeBrowsing yes

# This option enables downloading of bytecode.cvd, which includes additional
# detection mechanisms and improvements to the ClamAV engine.
# Default: enabled
#Bytecode yes

# Download an additional 3rd party signature database distributed through
# the ClamAV mirrors. 
# This option can be used multiple times.
#ExtraDatabase dbname1
#ExtraDatabase dbname2

Entrambi i suddetti file sono abbastanza basilari, potete dunque modificarli in base alle vostre esigenze.

Per verificare che tutto è stato configurato correttamente, lanciamo un prompt dei comandi (con privilegi di amministratore) ed eseguiamo clamd.exe:

C:\Program Files\ClamAV\clamd.exe

Se non vegnono riportati errori di sorta possiamo procedere con il download delle firme aggiornate e con l’installazione del suddetto applicativo sottoforma di servizio.

Per scaricare le firme è sufficiente lanciare il comando:

C:\Program Files\ClamAV\freshclam.exe

Installazione di ClamD come servizio

Per effettuare tale operazione si possono seguire 2 strade: la prima consiste nell’utilizzare il tool nativo di Windows sc; la seconda, che preferisco, prevede l’uso del tool nssm (che potete scaricare da qui).

Procediamo dunque con l’installazione del servizio lanciando il seguente comando (dopo aver estratto l’archivio contenente la versione a 64 bit dell’applicativo appena scaricato):

nssm install ClamD  "C:\Program Files\ClamAV\clamd.exe"

Se l’installazione è andata a buon fine possiamo procedere con l’avvio del servizio utilizzando il comando:

net start ClamD

oppure avvalendoci di services.msc.

Infine, per fare in modo che gli aggiornamenti dell’antivirus vengano scaricati automaticamente ogni notte, è sufficiente utilizzare il seguente scrip *.bat:

@echo off

echo %DATE% %TIME% : Starting ClamD signature update

"C:\Program Files\ClamAV\freshclam.exe"

net stop ClamD

net start ClamD

echo %DATE% %TIME% : ClamD signature update completed

echo ------------------------------------------------------------------

e creare un apposito task mediante il task scheduler di Windows (con l’opzione >> “C:\Program Files\ClamAv\clamd_update.log”, in modo da tenere traccia dello status relativo agli aggiornamenti automatici).

Adesso il nostro server di posta è più sicuro.

Alla prossima.

Logica di funzionamento del DNS (Domain Name System)

Prima di approfondire un argomento che avevo già trattato tempo addietro, ovvero il DNS cache poisoning (vedi qui per ulteriori dettagli), è utile illustrare la logica di funzionamento su cui si basa il Domain Name System.

Esistono, in soldoni, 2 tipologie di query DNS:
1) ricorsive;
2) iterative.

Supponiamo che il client voglia risolvere l’FQDN www.ciao.com

Nel primo caso il client contatterà il proprio resolver (ad esempio il nameserver dell’ISP) sottoponendogli la query. Se la risposta non è contenuta all’interno
della sua cache, esso effettuerà una query ai root nameserver. I root nameserver forniranno una risposta di tipo referral (con ANSWER SECTION vuota ed AUTHORITY SECTION non vuota), contenente una lista di nameserver da contattare per il top level domain (in gergo TLD) .com.
A questo punto il resolver contatterà uno dei nameserver autoritativi appena individuati, il quale fornirà una risposta di tipo referral indicando il nameserver autoritativo per il dominio cercato. Infine, quest’ultimo verrà interrogato e fornirà una risposta alla query (ANSWER SECTION non vuota) indicando l’indirizzo IP relativo al record A (www) ricercato (sempre se il suddetto record esiste).
La risposta, una volta giunta al resolver, verrà quindi girata al client.

recursiveDa notare che sia i root nameserver che i nameserver autoritativi per i TLD forniscono esclusivamente risposte di tipo referral, ergo funzionano solo
in modalità iterativa. Infatti, pensate a cosa accadrebbe se ciascun root nameserver interrogato (13 in tutto) iniziasse a fare query ricorsive per individuare
un determinato indirizzo IP… sarebbe una scelta davvero sconveniente (per usare un’espressione moderata) sia in termini di carico che in termini di latenza.

Inoltre, ciascun software che svolge funzioni di namserver utilizza degli algoritmi ben precisi per individuare il server a cui sottoporre la query (root, TLD o autoritativo che sia).
Nella fattispecie, bind usa la tecnica dell’RTT (Round Trip Time), grazie alla quale dovrebbe riuscire ad individuare il namserver più peformante (che coincide con quello che ha risposto più velocemente alla query).

Per ciò che concerne le query iterative, esse prevedono (in generale) il coinvolgimento diretto del client. Per prima cosa esso sottoporrà la query al proprio resolver, che gli risponderà con la lista dei root nameserver (risposta di tipo referral). Il root nameserver successivamente contattato dal client, gli fornirà una risposta di tipo referral indicando una lista di namserver autoritativi per il TLD .com. Dopodichè il client sottoporrà la query ad uno dei predetti nameserver, il quale gli fornirà come risposta una lista dei namserver autoritativi per il dominio ciao.com.
Infine, il client contatterà uno dei nameserver autoritativi per ciao.com che gli girerà la risposta contenente l’indirizzo IP per www.ciao.com (sempre se il record esiste).

Un esempio di query iterativa più essere facilmente ricavato utilizzando dig con l’opzione +trace, ad esempio:

[root@linuxbox ~]# dig +trace www.ciao.com

; <<>> DiG 9.8.2rc1-RedHat-9.8.2-0.37.rc1.el6_7.2 <<>> +trace www.ciao.com
;; global options: +cmd
.                       440639  IN      NS      b.root-servers.net.
.                       440639  IN      NS      m.root-servers.net.
.                       440639  IN      NS      h.root-servers.net.
.                       440639  IN      NS      k.root-servers.net.
.                       440639  IN      NS      a.root-servers.net.
.                       440639  IN      NS      i.root-servers.net.
.                       440639  IN      NS      f.root-servers.net.
.                       440639  IN      NS      e.root-servers.net.
.                       440639  IN      NS      j.root-servers.net.
.                       440639  IN      NS      d.root-servers.net.
.                       440639  IN      NS      l.root-servers.net.
.                       440639  IN      NS      g.root-servers.net.
.                       440639  IN      NS      c.root-servers.net.
;; Received 496 bytes from 192.168.1.1#53(192.168.1.1) in 38 ms

com.                    172800  IN      NS      a.gtld-servers.net.
com.                    172800  IN      NS      b.gtld-servers.net.
com.                    172800  IN      NS      c.gtld-servers.net.
com.                    172800  IN      NS      d.gtld-servers.net.
com.                    172800  IN      NS      e.gtld-servers.net.
com.                    172800  IN      NS      f.gtld-servers.net.
com.                    172800  IN      NS      g.gtld-servers.net.
com.                    172800  IN      NS      h.gtld-servers.net.
com.                    172800  IN      NS      i.gtld-servers.net.
com.                    172800  IN      NS      j.gtld-servers.net.
com.                    172800  IN      NS      k.gtld-servers.net.
com.                    172800  IN      NS      l.gtld-servers.net.
com.                    172800  IN      NS      m.gtld-servers.net.
;; Received 490 bytes from 192.203.230.10#53(192.203.230.10) in 4323 ms

ciao.com.               172800  IN      NS      dns2.progtech.net.
ciao.com.               172800  IN      NS      dns.progtech.net.
;; Received 111 bytes from 192.33.14.30#53(192.33.14.30) in 623 ms

www.ciao.com.           86400   IN      A       185.60.164.38
ciao.com.               86400   IN      NS      dns2.progtech.net.
ciao.com.               86400   IN      NS      dns.progtech.net.
;; Received 127 bytes from 80.190.149.57#53(80.190.149.57) in 82 ms

Per completezza, riporto il contenuto di una risposta ad una quey DNS, con le relative sezioni (QUERY, ANSWER, AUTHORITY, ADDITIONAL)

[root@linuxbox ~]# dig libero.it

; <<>> DiG 9.8.2rc1-RedHat-9.8.2-0.37.rc1.el6_7.2 <<>> libero.it
;; global options: +cmd
;; Got answer:
;; ->>HEADER<<- opcode: QUERY, status: NOERROR, id: 23298
;; flags: qr rd ra; QUERY: 1, ANSWER: 1, AUTHORITY: 2, ADDITIONAL: 2

;; QUESTION SECTION:
;libero.it.                     IN      A

;; ANSWER SECTION:
libero.it.              300     IN      A       37.9.239.32

;; AUTHORITY SECTION:
libero.it.              10799   IN      NS      n2.libero.it.
libero.it.              10799   IN      NS      n1.libero.it.

;; ADDITIONAL SECTION:
n2.libero.it.           10799   IN      A       156.154.67.47
n1.libero.it.           10799   IN      A       156.154.66.47

;; Query time: 256 msec
;; SERVER: 10.1.1.1#53(10.1.1.1)
;; WHEN: Tue May 31 09:29:06 2016
;; MSG SIZE  rcvd: 109

essa ci tornerà utile quando vedremo più nel dettaglio la logica su cui si basa il DNS cache poisoning.

DNS Spoofing a fin di bene

Facendo una rapida ricerca su Google si evince che il DNS Spoofing è una tecnica di cracking che rientra nella categoria MITM (Man in The Middle), tramite la quale “si fa credere” al PC della vittima che il sito X (ad esempio www.facebook.com) risponde all’indirizzo IP della macchina dell’aggressore (ad esempio 192.168.1.5). Se oltre a ciò sulla macchina dell’aggressore è presente anche una replica della home di facebook (ottenuta, ad esempio, mediante wget), le credenziali della vittima potranno essere facilmente individuate, a meno di messaggi HSTS (connessione non sicura/sito non attendibile) e di utenti più smaliziati (assenza del “lucchetto” di fianco alla barra degli indirizzi del browser).

Essa può essere realizzata seguendo 2 alternative: l’inserimento di record ad hoc all’interno del file hosts della macchina vittima oppure modificando il suo nameserver primario (dalle impostazioni di rete). In quest’ultimo caso parliamo di DNS Hijacking.

dnsspoofing

Dopo questa breve premessa è comunque utile fare una precisazione: il DNS Spoofing non è sempre sinonimo di cracking. Infatti, basti pensare al caso in cui l’ISP decide di “bloccare” l’accesso ad un sito per via dei suoi contenuti, agendo direttamente sui propri nameserver in modo da creare una mappatura statica indirizzo IP/FQDN che rimanda ad una pagina Web specifica, in cui viene notificato all’utente il blocco in atto (con eventuale registrazione degli indirizzi delle macchine che tentano di accedervi).

Un altro caso di utilizzo “bonario” della tecnica in questione riguarda il “blocco” di domini che veicolano notoriamente spyware, adaware e malware di ogni tipo. In questo post vi mostrerò come configurare il nameserver locale (realizzato grazie a dnsmasq, vedi qui per ulteriori dettagli) in modo da ottenere il blocco dei suddetti domini, semplicemente facendoli puntare a 127.0.0.1 (localhost).

Occorre precisare, inoltre, che tale tecnica funziona solo ed esclusivamente nel caso in cui gli utenti non abbiano privilegi di amministrazione sulle loro macchine e che quindi non siano in grado di modificare le impostazioni delle schede di rete (lasciando come nameserver primario quello da noi configurato). In aggiunta, la manutenibilità dei siti da bloccare è di gran lunga superiore rispetto a quella offerta dai blocchi mediante file hosts di ciascuna macchina (poichè, nel primo caso, si ha a disposizione una lista “centralizzata” di domini malevoli).

Ma passiamo alla configurazione vera e propria di dnsmasq. I domini che intendiamo bloccare sono i seguenti:

doubleclick.net
scorecardresearch.com
criteo.com
imrworldwide.com

per cui le direttive da aggiungere a dnsmasq saranno le seguenti:

address=/doubleclick.net/127.0.0.1
address=/scorecardresearch.com/127.0.0.1
address=/criteo.com/127.0.0.1
address=/imrworldwide.com/127.0.0.1

da notare che verranno bloccati non solo i suddetti domini, ma anche tutti gli eventuali sottodomini ad essi riconducibili.

Riavviamo dnsmasq:

root@ubuntubox:~# service dnsmasq restart

e testiamo il funzionamento del blocco appena configurato, pingando uno dei domini che intendiamo “dirottare” su localhost:

root@ubuntubox:~# ping criteo.com
PING criteo.com (127.0.0.1) 56(84) bytes of data.
64 bytes from localhost (127.0.0.1): icmp_req=1 ttl=64 time=0.035 ms
64 bytes from localhost (127.0.0.1): icmp_req=2 ttl=64 time=0.037 ms
64 bytes from localhost (127.0.0.1): icmp_req=3 ttl=64 time=0.036 ms

ed anche qualche sottodominio:

root@ubuntubox:~# ping pippo.criteo.com
PING pippo.criteo.com (127.0.0.1) 56(84) bytes of data.
64 bytes from localhost (127.0.0.1): icmp_req=1 ttl=64 time=0.033 ms
64 bytes from localhost (127.0.0.1): icmp_req=2 ttl=64 time=0.051 ms
64 bytes from localhost (127.0.0.1): icmp_req=3 ttl=64 time=0.040 ms
64 bytes from localhost (127.0.0.1): icmp_req=4 ttl=64 time=0.039 ms

Infine, diamo una ripulita ai PC degli utenti utilizzando software specifici quali Malwarebytes (in modo da eliminare il problema alla radice), continuando anche a monitorare le hit del proxy alla ricerca di eventuali domini “sospetti”.

Alla prossima.

PS: tale tecnica, a mio avviso, è più performante (ma meno malleabile) rispetto al blocco realizzato mediante l’uso di un proxy (ad esempio squid + squidguard), poichè agendo direttamente sul meccanismo di risoluzione dei nomi, si crea meno overhead e si ottengono tempi di risposta molto più ridotti.

dnsmasq ed Ubuntu: configurare un server DNS/DHCP per ambienti SOHO

Premesso che per mettere in piedi un nameserver locale si possono utilizzare diverse soluzioni open source, anche di tipo enterprise (una su tutte è rappresentata da bind/named), ho deciso di installare dnsmasq su un server Ubuntu per 2 motivi:

1) la rete aveva dimensioni estremamente ridotte (un server, qualche workstation e 3 stampanti), quindi rientrava nell’ambito delle infrastrutture SOHO (Small Office Home Office);

2) vi era la necessità di tirar su anche un servizio di DHCP, configurabile direttamente sull’applicativo in questione (che quindi può svolgere, contemporaneamente, sia il ruolo di nameserver che quello di DHCP server).

dnsmasq

Configurazione del DHCP server

Fare in modo che dnsmasq svolga le funzioni tipiche di un server DHCP è un’operazione abbastanza banale. Infatti, è sufficiente editare la configurazione del demone in questione (operando sul file /etc/dnsmasq.conf), aggiungendo le seguenti direttive:

no-dhcp-interface=eth1

dhcp-range=eth1,192.168.0.100,192.168.0.199,8h

In particolare, ho messo in ascolto il server DHCP sulla sola interfaccia eth0 (dato che si tratta di una macchina dual homed, in cui la scheda eth1 è collegata ad Internet mediante uno screened router). Inoltre, ho definito il pool di indirizzi che possono assere assegnati ai client che ne fanno richiesta, con relativo lease time (8h).

Configurazione del nameserver

Tale configurazione è un po’ più complessa rispetto alla precedente ma risulta comunque abbordabile.

Diciamo che dnsmasq è un nameserver “giocattolo”, in cui molti record DNS devono essere definiti all’interno di un file “piatto”, quale, ad esempio, /etc/hosts (anche se è possibile definire un file ad hoc per tale scopo), senza che vi sia quindi la necessità di creare una specifica zona DNS (cosa che invece risulta essere mandatoria con altri nameserver “un po’ più seri”).

I record di tipo A presenti nel file /etc/hosts avevano un formato simile al seguente:

192.168.0.2     proxy
192.168.0.4     server1
192.168.0.5     PC1
192.168.0.6     stampante1
192.168.0.7     stampante2
192.168.0.9     stampante3
192.168.0.10    PC2

Per quanto riguarda, invece, la configurazione del servizio DNS, ho abilitato le seguenti direttive (all’interno del file /etc/dnsmasq.conf):

interface=eth0
except-interface=eth1
listen-address=192.168.0.2

expand-hosts

domain=soho.loc

Le prime 3 servono a mettere in ascolto il server solo ed esclusivamente sull’interfaccia rivolta verso la LAN. Con expand-hosts e domain=soho.loc, invece,  ho fatto in modo che le query DNS vadano a buon fine anche nel caso in cui venga fornito il solo hostname della macchina di cui si vuole conoscere l’indirizzo IP.

Poichè il suddetto nameserver deve risolvere solo ed esclusivamente gli indirizzi locali, ho dovuto definire i forwarder (o nameserver di upstream) a cui inviare le query per tutte le zone DNS pubbliche. La direttive che ho utilizzato sono le seguenti:

resolv-file=/etc/resolv.dnsmasq
strict-order

dove il contenuto del file /etc/resolv.dnsmasq era il seguente:

nameserver 8.8.8.8
nameserver 208.67.222.222
nameserver 8.8.4.4
nameserver 208.67.220.220

La direttiva strict-order faceva in modo che i forwarder venissero contattati seguendo  l’ordine con cui sono stati definiti all’interno del suddetto file (il secondo nameserver viene contattato solo nel caso in cui il primo non sia raggiungibile, ergo, per ottenere una maggiore ridondanza, ho deciso di alternare ai nameserver di Google quelli di OpenDNS).

Per avere un maggiore controllo sulle query inoltrate al nameserver locale, ho deciso di loggarle su un apposito file di testo grazie ai seguenti parametri di configurazione:

log-queries
log-facility=/var/log/dnsmasq/query.log

Ho anche configurato la rotazione dei log mediante il file dnsmasq posto all’interno della directory /etc/logrotate.d:

/var/log/dnsmasq/query.log {
        rotate 7
        weekly
        compress
        missingok
        notifempty
}

Infine, affinchè i client della LAN riuscissero a “riconoscere” i record DNSSEC (garantendo loro una maggiore sicurezza durante la navigazione su Internet), ho fatto in modo che dnsmasq girasse le query DNSSEC ai forwarder (demandando loro il ruolo di validator).

La direttiva che mi ha consentito di fare ciò è la seguente:

proxy-dnssec

Il fatto che il nameserver primario di Google (8.8.8.8) sia il primo della lista dei forwarder non è certamente un caso. Infatti, esso garantisce dei tempi di risposta più brevi rispetto a quelli di OpenDNS, oltre ad essere anche DNSSEC compliant (cosa che OpenDNS non è).

In definitiva, la configurazione di dnsmasq (in base alle mie esigenze) si è rivelata essere la seguente:

no-dhcp-interface=eth1

dhcp-range=eth1,192.168.0.100,192.168.0.199,8h

interface=eth0
except-interface=eth1
listen-address=192.168.0.2

expand-hosts

domain=soho.loc

resolv-file=/etc/resolv.dnsmasq
strict-order

log-queries
log-facility=/var/log/dnsmasq/query.log

proxy-dnssec

Dopo aver effettuato un controllo sintattico della suddetta configurazione mediante il comando:

root@ubuntubox:~# dnsmasq --test

ed aver riavviato il demone:

root@ubuntubox:~# service dnsmasq restart

sono passato ai test funzionali mediante dig. Per prima cosa ho effettuato una query di tipo A per il record proxy, utilizzando dapprima il solo hostname:

root@fw-scar:~# dig @localhost proxy

; <<>> DiG 9.8.1-P1 <<>> @localhost proxy
; (2 servers found)
;; global options: +cmd
;; Got answer:
;; ->>HEADER<<- opcode: QUERY, status: NOERROR, id: 3216
;; flags: qr aa rd ra; QUERY: 1, ANSWER: 1, AUTHORITY: 0, ADDITIONAL: 0

;; QUESTION SECTION:
;proxy.                         IN      A

;; ANSWER SECTION:
proxy.                  0       IN      A       192.168.0.2

;; Query time: 1 msec
;; SERVER: 127.0.0.1#53(127.0.0.1)
;; WHEN: Fri May 20 15:50:11 2016
;; MSG SIZE  rcvd: 39

e successivamente l’intero FQDN:

 root@fw-scar:~# dig @localhost proxy.soho.loc

; <<>> DiG 9.8.1-P1 <<>> @localhost proxy.soho.loc
; (2 servers found)
;; global options: +cmd
;; Got answer:
;; ->>HEADER<<- opcode: QUERY, status: NOERROR, id: 30251
;; flags: qr aa rd ra; QUERY: 1, ANSWER: 1, AUTHORITY: 0, ADDITIONAL: 0

;; QUESTION SECTION:
;proxy.soho.loc.                        IN      A

;; ANSWER SECTION:
proxy.soho.loc.         0       IN      A       192.168.0.2

;; Query time: 1 msec
;; SERVER: 127.0.0.1#53(127.0.0.1)
;; WHEN: Fri May 20 15:52:15 2016
;; MSG SIZE  rcvd: 48

Successivamente mi sono concentrato sui tempi di risposta per i domini pubblici (da parte dei forwarder), ottenendo i seguenti tempi pre-cashing:

root@fw-scar:~# dig @localhost repubblica.it | grep "Query time"
;; Query time: 50 msec

e post caching:

root@fw-scar:~# dig @localhost repubblica.it | grep "Query time"
;; Query time: 0 msec

Infine, ho testato la risoluzione dei record DNSSEC, utilizzando il comando:

root@fw-scar:~# dig @localhost pir.org +dnssec +multi

; <<>> DiG 9.8.1-P1 <<>> @localhost pir.org +dnssec +multi
; (2 servers found)
;; global options: +cmd
;; Got answer:
;; ->>HEADER<<- opcode: QUERY, status: NOERROR, id: 35285
;; flags: qr rd ra ad; QUERY: 1, ANSWER: 2, AUTHORITY: 0, ADDITIONAL: 1

;; OPT PSEUDOSECTION:
; EDNS: version: 0, flags: do; udp: 512
;; QUESTION SECTION:
;pir.org.               IN A

;; ANSWER SECTION:
pir.org.                299 IN A 97.107.141.235
pir.org.                299 IN RRSIG A 5 2 300 20160602204000 (
                                20160519204000 58424 pir.org.
                                cJwr7HlIMA+DyQ8vqqmkNtHRAqsGVdKWTQkJeP/a5698
                                UTyK/cF08uYhH8xMk9I0RMWqtkJDM8od8hWmYUZgidzi
                                7Fh26m1FQYGAcN/PMw2/6wEnNh4ErWZtXe2fXRAS8btx
                                I+nyRPOCoAHR3CjC0cjKqtniUoWHt5x/51iEBw4= )

;; Query time: 86 msec
;; SERVER: 127.0.0.1#53(127.0.0.1)
;; WHEN: Fri May 20 15:57:36 2016
;; MSG SIZE  rcvd: 219

ricevendo come risposta sia il record A che il relativo RRSIG.

Alla fine della fiera ho messo in piedi un server DNS/DHCP funzionante e funzionale.

Alla prossima.

Hub vs switch: facciamo un po’ di chiarezza

Qualche tempo fa un mio collega (che svolge tutt’altra mansione rispetto alla mia e che quindi non è un tecnico), mi ha chiesto quale fosse la differenza tra hub e switch, dato che i primi sono ormai quasi del tutto irreperibili sul mercato (a meno di qualche aggeggio usato).

In soldoni, gli hub non sono altro che dei repeater “multiporta” (lasciatemi passare il termine), ovvero il traffico ricevuto su ciascuna porta viene inoltrato, indifferentemente, su tutte le altre. Toccherà poi alle schede di rete dei dispositivi connessi all’hub “capire” se il MAC address di destinazione del frame è il proprio (in questo caso lo accetteranno) oppure è associato a qualche altra macchina, scartandolo. L’ultima affermazione è vera solo ed esclusivamente se la suddetta scheda di rete non è configurata in modalità promiscua. Questa modalità, infatti, le consentirebbe di “accettare” tutti i frame, indifferentemente dal fatto che siano destinati ad essa o meno (e ciò è indispensabile nel caso in cui si voglia sniffare il traffico dei dispositivi connessi all’hub).

comparison

Ad esempio, per mettere un’interfaccia in modalità promiscua su una macchina Linux, occorre digitare il comando:

[root@linuxbox ~]# ifconfig <nome_interfaccia> promisc

Inoltre, tale modalità viene abilitata in automatico nel caso in cui sulla Linux box sia installato ed attivo un software che funge da NIDS, quale snort.

Un’altra peculiarità dell’hub riguarda la gestione dei cosiddetti domini di collisione. Infatti, tutti i dispositivi collegati ad esso faranno parte del medesimo dominio di collisione, mentre gli switch, per definizione, riescono a garantire un dominio di collisione ad-hoc per ciascuna porta di cui sono dotati. Per essere più precisi, gli switch sono caratterizzati dalla presenza di una memoria interna, in gergo CAM (acronimo che sta per Content Access Memory), in cui vengono memorizzate le accoppiate MAC address sorgente/porta su cui è stato ricevuto. Tale fase di popolamento della CAM avviene per gradi, ovvero man mano che i dispositivi collegati a ciascuna porta iniziano a trasmettere: quando lo switch vede come MAC sorgente un dato indirizzo L2 su una specifica porta, memorizzerà tale accoppiata all’interno della CAM. Successivamente, quando un frame recante uno specifico MAC di destinazione verrà ricevuto dallo switch, esso lo inoltrerà solo ed esclusivamente sulla porta in cui il dispositivo recante il suddetto MAC è collegato.

Il vantaggio di tale meccanismo di gestione del traffico è abbastanza chiaro: mettendo in comunicazione solo mittente e destinatario, si viene a creare una sorta di “mezzo trasmissivo” dedicato tra di essi, riducendo notevolmente (ma non eliminando completamente) il rischio di collisioni (almeno per quanto riguarda le reti half duplex in cui tale fenomeno può verificarsi). Tirando le somme, è proprio per questo motivo che lo switch “garantisce” un dominio di collisione dedicato per ciascuna porta di cui è dotato. Inoltre, lo sniffing del traffico risulta impossibile, a meno che su una delle porte dello switch sia configurato il cosiddetto port mirroring (che la Cisco chiama SPANCatalyst Switched Port Analyzer). Nella fattispecie, essa consente di inoltrare il traffico ricevuto (su una o più porte) su quella in cui è configurato il mirroring (solitamente utilizzo allo scopo l’ultima porta dello switch o le ultime 2). Va da se che anche in questo caso l’interfaccia del PC adibito a sniffer deve essere configurata in modalità promiscua.

Spero di aver fatto un po’ di luce sulla questione.

Alla prossima.

lftp: mirroring di un sito remoto da CLI

Supponiamo che vi sia la necessità di trasferire il contenuto di un sito Web su un altro sito Web autorizzato (tale pratica, in gergo, prende il nome di mirroring). Supponiamo, inoltre, che il task in questione debba essere automatizzato tramite un cronjob oppure uno scheduled task di Windows. Cosa fare dunque? Semplice, iniziare ad utilizzare lftp.

lftp

Il suddetto tool è dotato di una console integrata, che può essere richiamata digitando semplicemente lftp, ad esempio:

[root@linux ~]# lftp
lftp :~>

Nel caso in cui si volesse creare un task automatico, sconsiglio fortemente l’uso della console in questione (a meno di tool esterni, quali expect, in grado di interagire con essa), e raccomando di avvalersi dell’opzione -e, grazie alla quale i comandi lftp possono essere inviati direttamente da CLI, ad esempio:

lftp -u vostrouser,vostrapassword sitodamirrorare -e 'set ftp:use-feat off; set ftp:ssl-allow off; mirror -c / ../sitemirrored; exit'

Nella fattispecie, ho disabilitato l’invio del comando FEAT (ftp:use-feat off) ed ho inibito qualsiasi tentativo di connessione tramite FTPS (ftp:ssl-allow off). Inoltre, ho inizializzato il mirroring (comprensivo di resume in caso di disconnessione, grazie all’opzione -c che sta per –continue), specificando la directory sorgente (in questo caso /) e quella di destinazione (../sitemirrored).

Attenzione: se state utilizzando la versione Windows di lftp, consiglio di copiare l’eseguibile nella stessa unità in cui si trova la dir di destinazione, in quanto ho riscontrato diversi problemi relativi all’attraversamento delle directory.

Una volta completato il mirroring del sito, è possibile effettuare la stessa operazione in modo incrementale, ovvero “copiando” solo ed esclusivamente i nuovi file (quelli che non presenti durante la prima tornata). Il comando da utilizzare è il seguente:

lftp -u vostrouser,vostrapassword sitodamirrorare -e 'set ftp:use-feat off; set ftp:ssl-allow off; mirror -n / ../sitemirrored; exit'

dove l’opzione -n sta per –only-newer.

Non ci resta che creare il cronjob (o lo scheduled task) ed abbiamo finito.

Alla prossima.

auto_clean_zombies: event handler per Nagios in grado di ripulire il sistema dai processi zombie

In questo post ho illustrato il codice di uno scrip da me realizzato, in grado di ripulire il sistema dai processi zombie. Ora vedremo come fare ad integrare, sotto forma di event handler, il predetto scrip con Nagios. Per prima cosa è necessario creare l’event handler vero e proprio (che funge da wrapper), il quale richiamerà lo scrip clean_zombies in caso di necessità:

#!/bin/bash

case "$1" in
OK)
        ;;
WARNING)
        ;;
UNKNOWN)
        ;;
CRITICAL)
       case "$2" in
                SOFT)
                        case "$3" in
                        3)
                                echo -n "Cleaning zombie processes (3rd soft critical state)..."
                                usr/bin/sudo /root/scrips/clean_zombies
                                ;;
                                esac
                        ;;
                HARD)
                        echo -n "Cleaning zombie processes (3rd soft critical state)..."
                        usr/bin/sudo /root/scrips/clean_zombies
                        ;;
                esac
                ;;
        esac

exit 0

Successivamente occorre creare un apposito comando all’interno del file /etc/nagios/object/commands.cfg:

# 'auto_clean_zombies' command definition
define command {
        command_name      auto_clean_zombies
        command_line      /usr/lib64/nagios/plugins/eventhandlers/auto_clean_zombies $SERVICESTATE$ $SERVICESTATETYPE$ $SERVICEATTEMPT$
        }

A questo punto possiamo assegnare l’event handler al servizio Total Processes definito nel file di configurazione dell’host per il quale si intende monitorare il numero dei processi:

define service{
        use                            local-service         
        host_name                      localhost
        service_descripion             Total Processes
        event_handler                  auto_clean_zombies
        check_command                  check_local_procs!280!400!RSZDT
        }

Inoltre, affinchè l’untente nagios possa lanciare il suddetto scrip senza che vi sia la necessità di inserire la password di autenticazione, occorre editare il file /etc/sudoers nel seguente modo:

nagios   ALL=NOPASSWD:   /root/scrips/clean_zombies

Ricarichiamo la configurazione di Nagios:

[root@linuxbox ~]# service nagios reload

ed abbiamo finito. Alla prossima.