Premessa
A differenza delle numerose guide cooked e dei vari howto che si possono trovare in rete, questo post (primo di una serie di 3), ha come scopo quello di illustrare in modo esaustivo i vari passi necessari per la realizzazione di una sistema NIDS.
Un po’ di teoria
Esistono diverse metodologie per difendere l’infrastruttura IT dai cyber attacchi, e, tutto sommato, le si può riassumere in 2 macro categorie, ovvero quelle attive e quelli passive. Per strategia difensiva attiva basti pensare ad un firewall, ad un antivirus oppure ad un IPS (Intrusion Preventetion System). Per contro, un tipico esempio di strategia difensiva di tipo passivo è rappresentato dai sistemi IDS (Intrusion Detection System), i quali possono agire localmente sulla macchina interessata (in tal caso parliamo di HIDS, ovvero Host IDS), oppure a livello di rete (in questo caso parliamo di NIDS, ovvero Network IDS).
I sistemi NIDS (detti anche sonde o sensori), non fanno altro che analizzare il traffico del segmento di rete a cui sono collegati (DMZ, LAN, Outside), alla ricerca di eventuali tentativi di attacco.
Solitamente, essi non vengono posizionati inline (come invece avviene per i sistemi IPS), ma sono collegati ad una porta dello switch configurata in mirror (monitor/span), sulla quale viene inoltrata una replica esatta di tutto il traffico passante per lo switch in questione. In questo modo un eventuale sovraccarico del sensore non comporterà automaticamente un rallentamento della rete in termini di throughput.
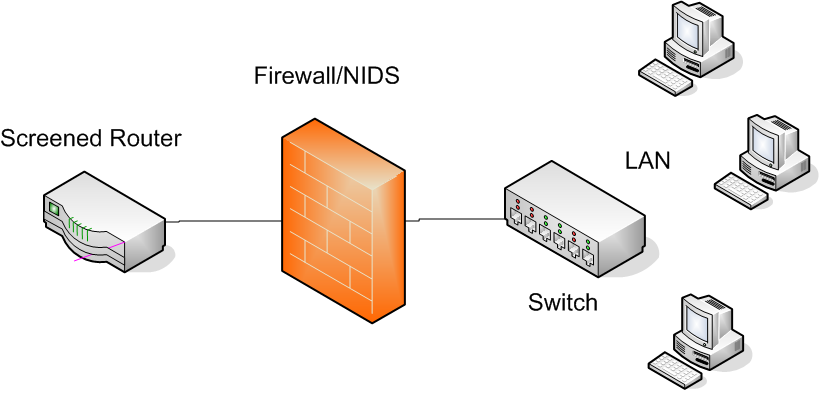
Topoligia
Poichè la rete sulla quale ho configurato il sistema NIDS è dotata di un firewall *nix che filtra tutto il traffico in ingresso ed in uscita, per questioni di budget e di praticità, ho ritenuto opportuno installare la sonda sulla macchina in questione. Va da se che l’analisi preventiva del carico computazionale a cui era soggetto il firewall ha restituito valori di overhead davvero irrisori, dunque l’installazione della sonda non ha comportato grossi cambiamenti in termini prestazionali.
Ingredienti
Il software che fungerà da sensore prende il nome di snort. Inoltre, per aggiornare in modo automatico le signature/pattern degli attacchi verrà utilizzato pulledpork (a tutti gli effetti il successore di oinkmaster), mentre per convertire in formato SQL e salvare gli alert generati da snort all’interno di un DB (MySQL) verrà utilizzato barnyard2. Infine, verrà installata sulla macchina ospite un’interfaccia Web (GUI) scritta in Ruby ed accessibile tramite Apache, dalla quale poter estrapolare gli allarmi con le relative statistiche, il cui nome è snorby (SNORt ruBY).
Occorre precisare che MySQL (DBMS) ed Apache (server Web) sono già installati sulla macchina ospite.
Installazione e configurazione di snort
Tale attività si divide in 3 step:
1) l’installazione dei software prerequisiti;
2) l’installazione delle librerie daq;
3) l’installazione e la configurazione di snort.
I software prerequisiti sono bison, flex, libpcap e libdnet e li si può installare utilizzando il packet manager di casa CentOS/Red Hat, ovvero yum:
yum install bison flex libpcap libpcap-devel libdnet libdnet-devel
Posizioniamoci nella directory /usr/local/src per poi scaricare, compilare ed installare le librerie daq (le quali servono a reindirizzare il network I/O ai software di “cattura” veri e propri, quali, ad esempio, PCAP, AFPACKET e simili):
wget https://www.snort.org/downloads/snort/daq-2.0.6.tar.gz
tar -xvf daq-2.0.6.tar.gz
cd daq-2.0.6
./configure
make
make install
ldconfig
cd ..
A questo punto possiamo scaricare ed installare snort:
wget https://www.snort.org/downloads/snort/snort-2.9.7.5.tar.gz
tar -xvf snort-2.9.7.5.tar.gz
cd snort-2.9.7.5
./configure
make
make install
Ad installazione completata creiamo utente e gruppo per il suddetto applicativo:
groupadd snort
useradd snort -g snort -s /sbin/nologin
per poi creare la directory su cui salvare i file di configurazione e le regole per la rilevazione delle intrusioni:
mkdir -p /etc/snort
mkdir -p /etc/snort/rules
cd etc
cp -R * /etc/snort
cd ..
Inoltre, scarichiamo le regole vere e proprie e salviamole all’interno della dir /etc/snort/rules:
wget https://www.snort.org/downloads/community/community-rules.tar.gz
tar -xvf community-rules.tar.gz
cd community-rules
cp * /etc/snort/rules
wget https://www.snort.org/downloads/registered/snortrules-snapshot-2975.tar.gz?oinkcode=<vostro oinkcode ricavabile dalla pagina Web di snort, previa registrazione>
tar -xvf nortrules-snapshot-2975.tar.gz
cd snortrules-snapshot-2975
cp -R preproc_rules/ /etc/snort/rules
cp -R so_rules/ /etc/snort/rules
cd rules
cp * /etc/snort/rules
Assegniamo il giusto owner alla directory /etc/snort:
chown snort:snort -R /etc/snort
e concentriamoci sulle dynamic rules (con relative librerie):
mkdir -p /usr/local/lib/snort_dynamicrules
chown -R snort:snort /usr/local/lib/snort_dynamicrules
cp /usr/local/src/so_rules/precompiled/RHEL-6-0/x86-64/2.9.7.5 /usr/local/lib/snort_dynamicrules
chmod -R 700 /usr/local/lib/snort_dynamicrules
Ora passiamo alla configurazione di snort:
nano /etc/snort/snort.conf
nella quale occorre definire le reti locali (HOME_NET), le reti esterne (EXTERNAL_NET), il pathname delle regole utilizzate da snort e quello delle whitelist/blacklist (basate sulla reputazione). Inoltre, bisogna definire il tipo di output generato da snort (il quale dovrà essere interpretabile da barnyard2).
Ecco uno stralcio delle modifiche apportate al file di configurazione di snort:
ipvar HOME_NET [192.168.1.0,192.168.12.0]
ipvar EXTERNAL_NET !$HOME_NET

var RULE_PATH /etc/snort/rules
var SO_RULE_PATH /etc/snort/rules/so_rules
var PREPROC_RULE_PATH /etc/snort/rules/preproc_rules

var WHITE_LIST_PATH /etc/snort/rules
var BLACK_LIST_PATH /etc/snort/rules

# Reputation preprocessor. For more information see README.reputation
preprocessor reputation: \
   memcap 500, \
   priority whitelist, \
   nested_ip inner, \
#   whitelist $WHITE_LIST_PATH/white_list.rules, \
   blacklist $BLACK_LIST_PATH/black_list.rules

output unified2: filename snort.log, limit 128
Creiamo la directory in cui snort dovrà salvare i log e gli allarmi, assegnandole il giusto owner:
mkdir -p /var/log/snort/
chown snort:snort /var/log/snort/
Infine, testiamo la configurazione di snort, lanciando il comando:
snort -T -i <interface-name> -u snort -g snort -c /etc/snort/snort.conf
il cui output (se non vi sono errori) dovrà contenere la seguente stringa:
Snort successfully validated the configuration!
Eseguire snort come demone
Per fare in modo che snort venga eseguito sulla macchina ospite come demone, occorre, prima di tutto, configurare le opzioni di avvio (definendole all’interno del file /etc/sysconfig/snort):
nano /etc/sysconfig/snort
il cui contenuto dovrà essere simile al seguente:
# /etc/sysconfig/snort
# $Id$

# All of these options with the exception of -c, which tells Snort where
# the configuration file is, may be specified in that configuration file as
# well as the command line. Both the command line and config file options
# are listed here for reference.

#### General Configuration

# What interface should snort listen on?  [Pick only 1 of the next 3!]
# This is -i {interface} on the command line
# This is the snort.conf config interface: {interface} directive
#INTERFACE=eth0
#
# The following two options are not directly supported on the command line
# or in the conf file and assume the same Snort configuration for all
# instances
#
# To listen on all interfaces use this:
INTERFACE=ALL
#
# To listen only on given interfaces use this:
#INTERFACE="eth1 eth2 eth3 eth4 eth5"

# Where is Snort's configuration file?
# -c {/path/to/snort.conf}
CONF=/etc/snort/snort.conf

# What user and group should Snort drop to after starting? This user and
# group should have very few privileges.
# -u {user} -g {group}
# config set_uid: user
# config set_gid: group
USER=snort
GROUP=snort

# Should Snort change the order in which the rules are applied to packets.
# Instead of being applied in the standard Alert->Pass->Log order, this will
# apply them in Pass->Alert->Log order.
# -o
# config order: {actions in order}
# e.g. config order: log alert pass activation dynamic suspicious redalert
PASS_FIRST=0

#### Logging & Alerting

# NOTE: NO_PACKET_LOG and BINARY_LOG, ALERTMODE, etc. are mutually
# exclusive. Use either NO_PACKET_LOG or any/all of the other logging
# options. But the more logging options use you, the slower Snort will run.

# Where should Snort log?
#
#-l {/path/to/logdir}
# config logdir: {/path/to/logdir}
LOGDIR=/var/log/snort

# config basename:
BASENAME=snort.log

# How should Snort alert? Valid alert modes include fast, full, none, and
# unsock.  Fast writes alerts to the default "alert" file in a single-line,
# syslog style alert message.  Full writes the alert to the "alert" file
# with the full decoded header as well as the alert message.  None turns off
# alerting. Unsock is an experimental mode that sends the alert information
# out over a UNIX socket to another process that attaches to that socket.
# -A {alert-mode}
# output alert_{type}: {options}
#ALERTMODE=full

# Should Snort dump the application layer data when displaying packets in
# verbose or packet logging mode.
# -d
# config dump_payload
DUMP_APP=1

# Should Snort keep binary (AKA pcap, AKA tcpdump) logs also? This is
# recommended as it provides very useful information for investigations.
# -b
# output log_tcpdump: {log name}
#BINARY_LOG=1

# Should Snort turn off packet logging?  The program still generates
# alerts normally.
# -N
# config nolog
NO_PACKET_LOG=0

# Print out the receiving interface name in alerts.
# -I
# config alert_with_interface_name
PRINT_INTERFACE=0

# When dumping the stats, what log file should we look in
SYSLOG=/var/log/messages

# When dumping the stats, how long to wait to make sure that syslog can
# flush data to disk
SECS=5

# To add a BPF filter to the command line uncomment the following variable
# syntax corresponds to tcpdump(8)
#BPF="not host 192.168.1.1"

# To use an external BPF filter file uncomment the following variable
# syntax corresponds to tcpdump(8)
# -F {/path/to/bpf_file}
# config bpf_file: /path/to/bpf_file
#BPFFILE=/etc/snort/bpf_file
a tal proposito, occorre precisare che è necessario commentare le direttive ALERTMODE e BINARY_LOG, altrimenti barnyard2 non sarà in grado di inserire gli allarmi all’interno del database.
Inoltre, poichè il sensore è posizionato inline, esso si trova in ascolto su tutte le interfacce della macchina (INTERFACE=ALL).
Di seguito riporto lo script che consente di demonizzare l’applicativo in questione:
#!/bin/sh
# $Id$
#
# snortd         Start/Stop the snort IDS daemon.
#
# chkconfig: 2345 40 60
# description:  snort is a lightweight network intrusion detection tool that \
#                currently detects more than 1100 host and network \
#                vulnerabilities, portscans, backdoors, and more.
#

# Source function library.
. /etc/rc.d/init.d/functions

# Source the local configuration file
. /etc/sysconfig/snort

#PID file location
PID=/var/run/snort

# Convert the /etc/sysconfig/snort settings to something snort can
# use on the startup line.
if [ "$ALERTMODE"X = "X" ]; then
   ALERTMODE=""
else
   ALERTMODE="-A $ALERTMODE"
fi

if [ "$USER"X = "X" ]; then
   USER="snort"
fi

if [ "$GROUP"X = "X" ]; then
   GROUP="snort"
fi

if [ "$BINARY_LOG"X = "1X" ]; then
   BINARY_LOG="-b"
else
   BINARY_LOG=""
fi

if [ "$CONF"X = "X" ]; then
   CONF="-c /etc/snort/snort.conf"
else
   CONF="-c $CONF"
fi

if [ "$INTERFACE"X = "X" ]; then
   INTERFACE="-i eth0"
else
   INTERFACE="-i $INTERFACE"
fi

if [ "$DUMP_APP"X = "1X" ]; then
   DUMP_APP="-d"
else
   DUMP_APP=""
fi

if [ "$NO_PACKET_LOG"X = "1X" ]; then
   NO_PACKET_LOG="-N"
else
   NO_PACKET_LOG=""
fi

if [ "$PRINT_INTERFACE"X = "1X" ]; then
   PRINT_INTERFACE="-I"
else
   PRINT_INTERFACE=""
fi

if [ "$PASS_FIRST"X = "1X" ]; then
   PASS_FIRST="-o"
else
   PASS_FIRST=""
fi

if [ "$LOGDIR"X = "X" ]; then
   LOGDIR=/var/log/snort
fi

# These are used by the 'stats' option
if [ "$SYSLOG"X = "X" ]; then
   SYSLOG=/var/log/messages
fi

if [ "$SECS"X = "X" ]; then
   SECS=5
fi

if [ ! "$BPFFILE"X = "X" ]; then
   BPFFILE="-F $BPFFILE"
fi

######################################
# Now to the real heart of the matter:

# See how we were called.
case "$1" in
  start)
        echo -n "Starting snort: "
        cd $LOGDIR
        if [ "$INTERFACE" = "-i ALL" ]; then
           for i in `cat /proc/net/dev|grep eth|awk -F ":" '{ print $1; }'`
           do
                mkdir -p "$LOGDIR/$i"
                chown -R $USER:$GROUP $LOGDIR
                daemon /usr/sbin/snort $ALERTMODE $BINARY_LOG $NO_PACKET_LOG $DUMP_APP -D $PRINT_INTERFACE -i $i -u $USER -g $GROUP $CONF -l $LOGDIR/$i

$PASS_FIRST $BPFFILE $BPF
           done
        else
           # check if more than one interface is given
           if [ `echo $INTERFACE|wc -w` -gt 2 ]; then
              for i in `echo $INTERFACE | sed s/"-i "//`
                do
                  mkdir -p "$LOGDIR/$i"
                  chown -R $USER:$GROUP $LOGDIR
                  daemon /usr/sbin/snort $ALERTMODE $BINARY_LOG $NO_PACKET_LOG $DUMP_APP -D $PRINT_INTERFACE -i $i -u $USER -g $GROUP $CONF -l $LOGDIR/$i

$PASS_FIRST $BPFFILE $BPF
             done
           else
              # Run with a single interface (default)
              daemon /usr/sbin/snort $ALERTMODE $BINARY_LOG $NO_PACKET_LOG $DUMP_APP -D $PRINT_INTERFACE $INTERFACE -u $USER -g $GROUP $CONF -l $LOGDIR

$PASS_FIRST $BPFFILE $BPF --pid-path $PID
           fi
        fi
        touch /var/lock/subsys/snort
        echo
        ;;
  stop)
        echo -n "Stopping snort: "
        killproc snort
        rm -f /var/lock/subsys/snort
        echo
        ;;
  reload)
        echo "Sorry, not implemented yet"
        ;;
  restart)
        $0 stop
        $0 start
        ;;
  condrestart)
        [ -e /var/lock/subsys/snort ] && $0 restart
        ;;
  status)
        status snort
        ;;
  stats)
        TC=125                          # Trailing context to grep
        SNORTNAME='snort'               # Process name to look for

        if [ ! -x "/sbin/pidof" ]; then
           echo "/sbin/pidof not present, sorry, I cannot go on like this!"
           exit 1
        fi

        #Grab Snort's PID
        PID=`pidof -o $$ -o $PPID -o %PPID -x ${SNORTNAME}`

        if [ ! -n "$PID" ]; then        # if we got no PID then:
           echo "No PID found: ${SNORTNAME} must not running."
           exit 2
        fi

        echo ""
        echo "*******"
        echo "WARNING:  This feature is EXPERIMENTAL - please report errors!"
        echo "*******"
        echo ""
        echo "You can also run: $0 stats [long | opt]"
        echo ""
        echo "Dumping ${SNORTNAME}'s ($PID) statistics"
        echo "please wait..."

        # Get the date and tell Snort to dump stats as close together in
        # time as possible--not 100%, but it seems to work.
        startdate=`date '+%b %e %H:%M:%S'`

        # This causes the stats to be dumped to syslog
        kill -USR1 $PID

        # Sleep for $SECS secs to give syslog a chance to catch up
        # May need to be adjusted for slow/busy systems
        sleep $SECS

        if [ "$2" = "long" ]; then              # Long format
            egrep -B 3 -A $TC "^$startdate .* snort.*: ={79}" $SYSLOG | \
                grep snort.*:
        elif [ "$2" = "opt" ]; then             # OPTimize format
           # Just show stuff useful for optimizing Snort
            egrep -B 3 -A $TC "^$startdate .* snort.*: ={79}" $SYSLOG | \
                egrep "snort.*: Snort analyzed |snort.*: dropping|emory .aults:"
        else                                    # Default format
            egrep -B 3 -A $TC "^$startdate .* snort.*: ={79}" $SYSLOG | \
                grep snort.*: | cut -d: -f4-
        fi
        ;;
  *)
        echo "Usage: $0 {start|stop|reload|restart|condrestart|status|stats (long|opt)}"
        exit 2
esac

exit 0
Copiamo il binario di snort nella dir /usr/sbin:
cp /usr/local/bin/snort /usr/sbin/
e rendiamo il suddetto scrip eseguibile, per poi avviarlo e fare in modo che venga eseguito automaticamente dopo ogni riavvio della macchina:
chmod +x /etc/init.d/snortd
chkconfig --add snortd
chkconfig snortd on
Per ora abbiamo finito. Nel prossimo post vedremo come installare e configurare pulledpork e barnyard2.
A presto.